Ready to put your TAO and Alpha tokens to work? This practical guide walks you through depositing liquidity into Bittensor's Native V3 Pools.
Before You Begin
What You'll Need:
- TAO tokens in your Bittensor wallet
- Basic understanding that you may experience impermanent loss
- Access to a subnet with V3 pools enabled
Important: Not all subnets have V3 pools enabled. Only subnet owners can enable this feature, so you will need to check which subnets allow user liquidity provision.
Step 1: Find Subnets with V3 Pools Enabled
- Navigate to the Subnet Screener Page
- Look for the list of available subnets
- Each subnet will show various metrics and icons

-
Identify V3-Enabled Subnets
- Look for the "Liquid Icon" next to subnet names
- If the Liquid Icon is active/clickable, that subnet has V3 pools enabled
- If the icon is grayed out or missing, V3 pools are not available for that subnet
-
Click on the Liquid Icon
- This will take you to the Liquidity Management page for that specific subnet
- You'll see the deposit interface for that subnet's TAO/Alpha pair

Step 2: Understanding Uniswap V3 Price Ranges
Before depositing, it's crucial to understand how Uniswap V3 works:
Key Concept: Concentrated Liquidity
- Unlike traditional pools where your liquidity is spread across all prices (0 to infinity)
- V3 allows you to concentrate your liquidity within a specific price range
- You set a minimum price and maximum price for your position
- Your liquidity position only earns fees when trading happens within your chosen range
How Price Ranges Work:
- Min Price: The lowest price at which your liquidity will be active
- Max Price: The highest price at which your liquidity will be active
- Current Price: The real-time market price of the Alpha token relative to TAO
Example: If you set Min Price = 0.05 TAO and Max Price = 0.08 TAO:
- Your liquidity earns fees only when the Alpha token trades between 0.05 and 0.08 TAO
- If price moves below 0.05 or above 0.08, your position won't earn fees until price returns to your range
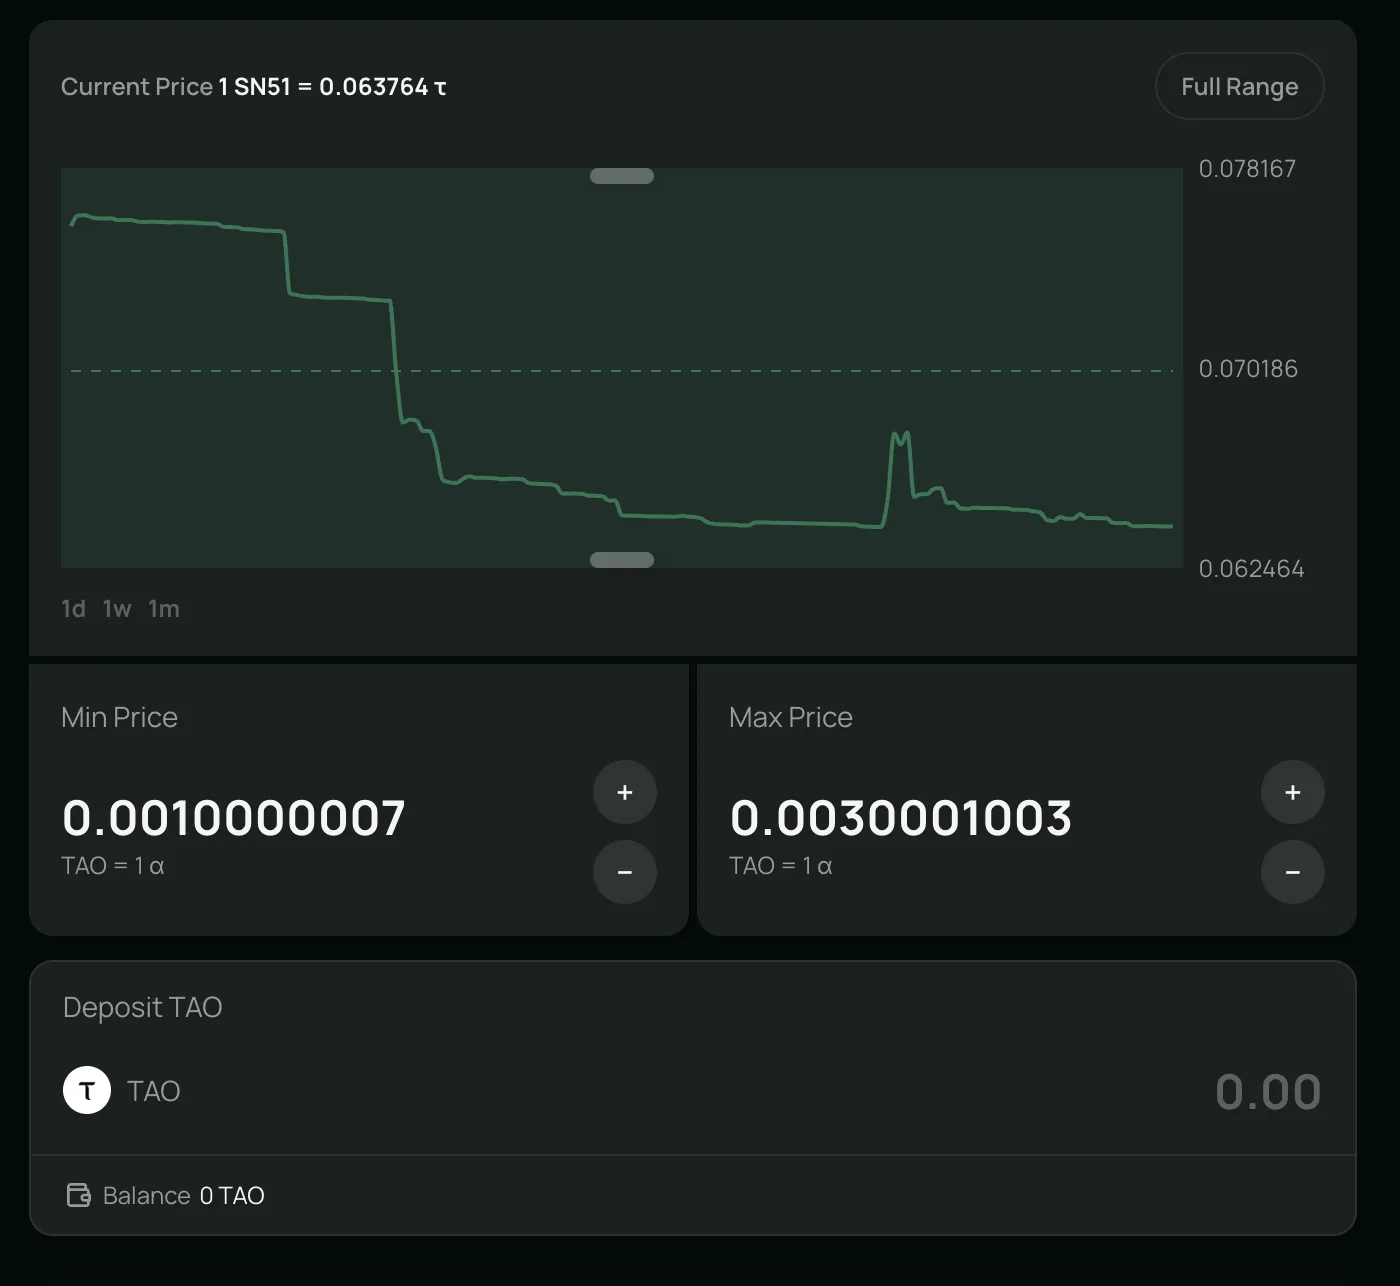
Step 3: Choose Your Price Range Strategy
Current Example: SN51 lium.io
- Current price: 1 SN51 = 0.063764 TAO
Based on where you set your price range relative to the current price, you'll need different tokens:
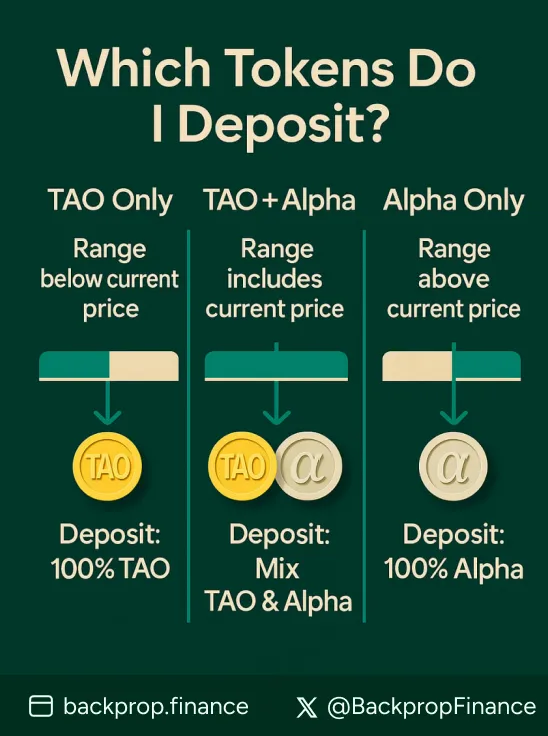
Scenario 1: Price Range Below Current Price (TAO Only)
When: Both min price AND max price are less than 0.063764 TAO
Example: Min Price = 0.050 TAO, Max Price = 0.060 TAO
- Deposit: Only TAO tokens needed
- Logic: Since current price (0.063764) is above your range, you start with 100% TAO
- What happens: As price falls into your range, TAO gradually converts to Alpha tokens
Scenario 2: Price Range Crossing Current Price (TAO + Alpha)
When: Min price is less than 0.063764 TAO AND max price is more than 0.063764 TAO
Example: Min Price = 0.050 TAO, Max Price = 0.080 TAO
- Deposit: Both TAO and Alpha tokens needed
- Logic: Current price is within your range, so you need both tokens
- Ratio: Depends on exactly where current price sits within your range
Scenario 3: Price Range Above Current Price (Alpha Only)
When: Both min price AND max price are more than 0.063764 TAO
Example: Min Price = 0.070 TAO, Max Price = 0.090 TAO
- Deposit: Only Alpha tokens needed
- Logic: Since current price (0.063764) is below your range, you start with 100% Alpha
- What happens: As price rises into your range, Alpha gradually converts to TAO
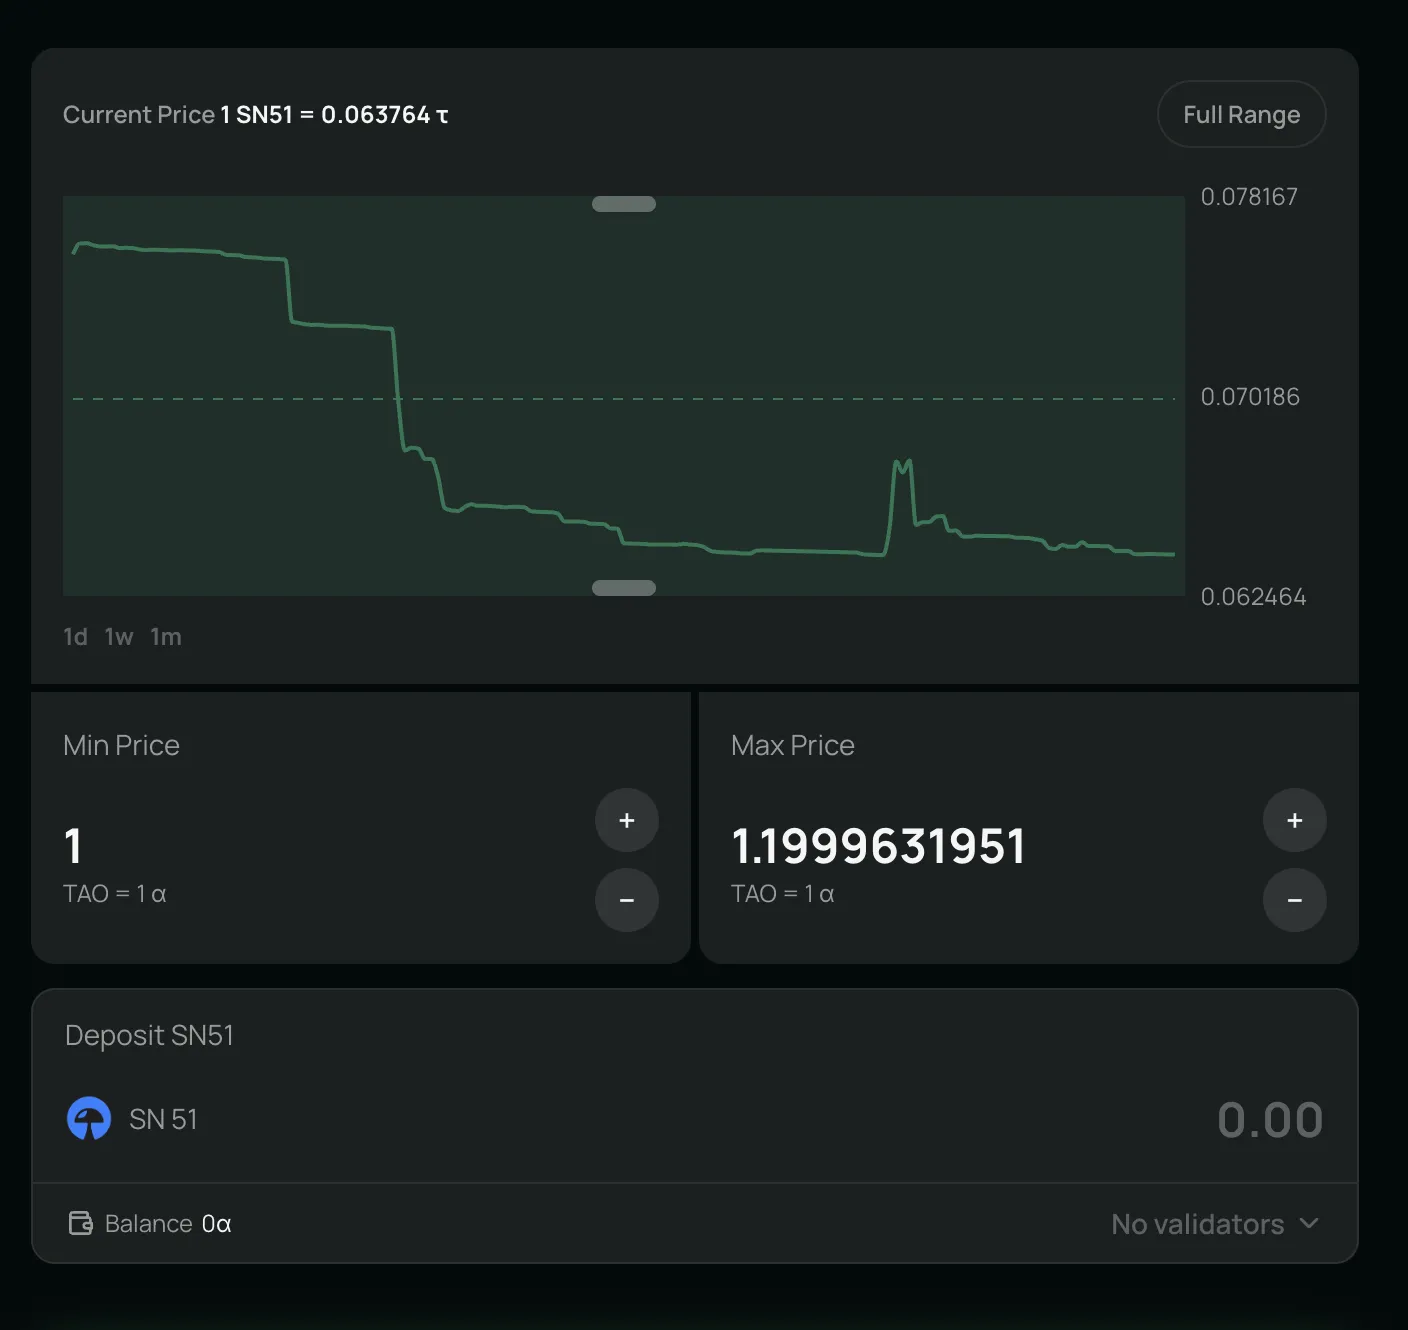
Step 4: Deposit Your Liquidity
-
Set Your Price Range
- Use the interface to set your min and max prices
- The interface will show you which tokens you need based on your range
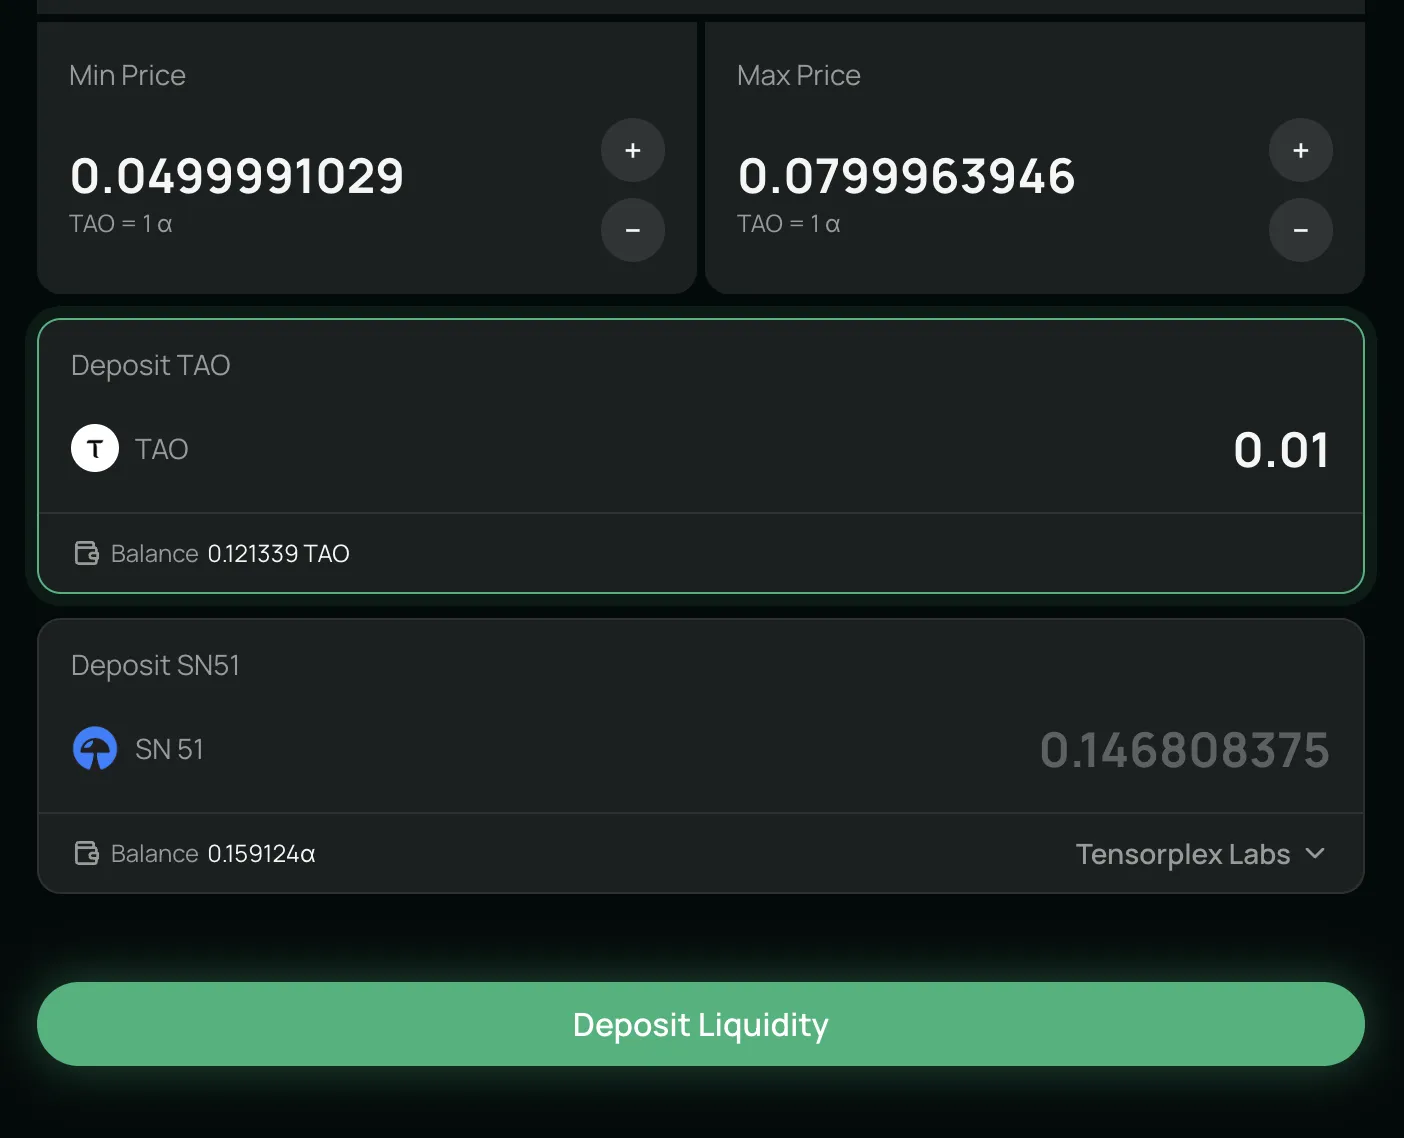
-
Enter Token Amounts
- For TAO-only scenarios: Enter your TAO amount
- For Alpha-only scenarios: Enter your Alpha amount
- For mixed scenarios: Enter amounts for both tokens as shown
-
Review and Confirm
- Double-check your price range
- Verify token amounts
- Click the "Deposit Liquidity" button
-
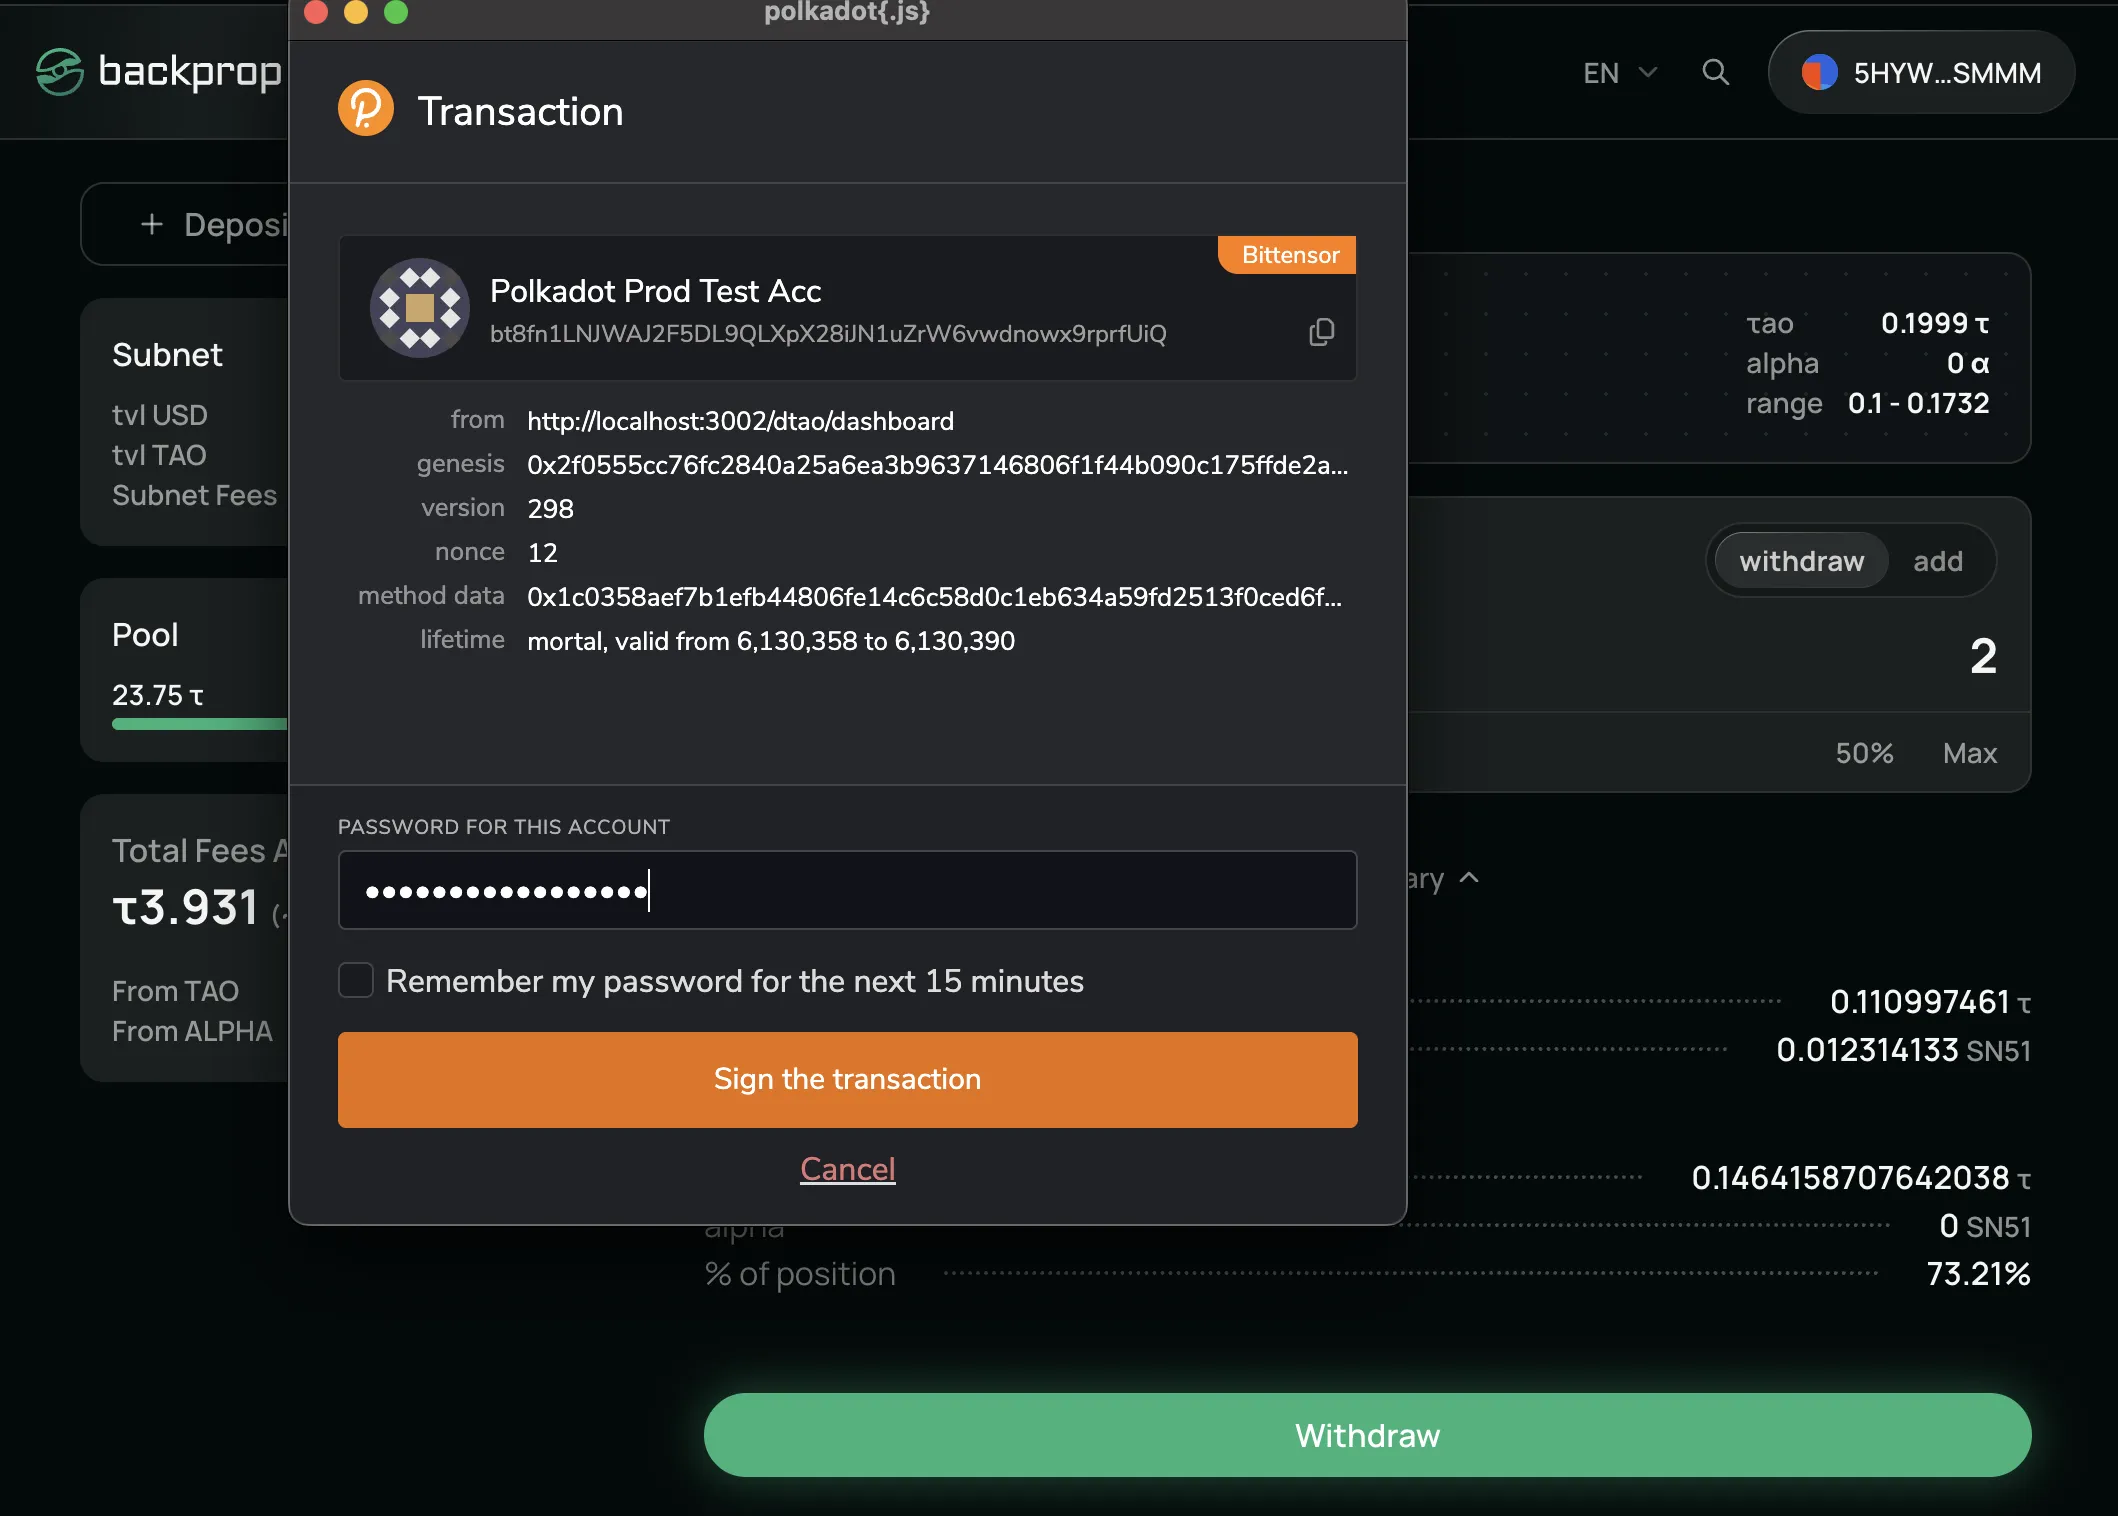
Sign the Transaction
- Enter your wallet password (in this case, Polkadot.js wallet)
- Click "Sign the transaction" to confirm
- Monitor Your Position
- Your position earns fees when trading occurs within your price range
- You can add more liquidity, remove liquidity, or collect fees at any time
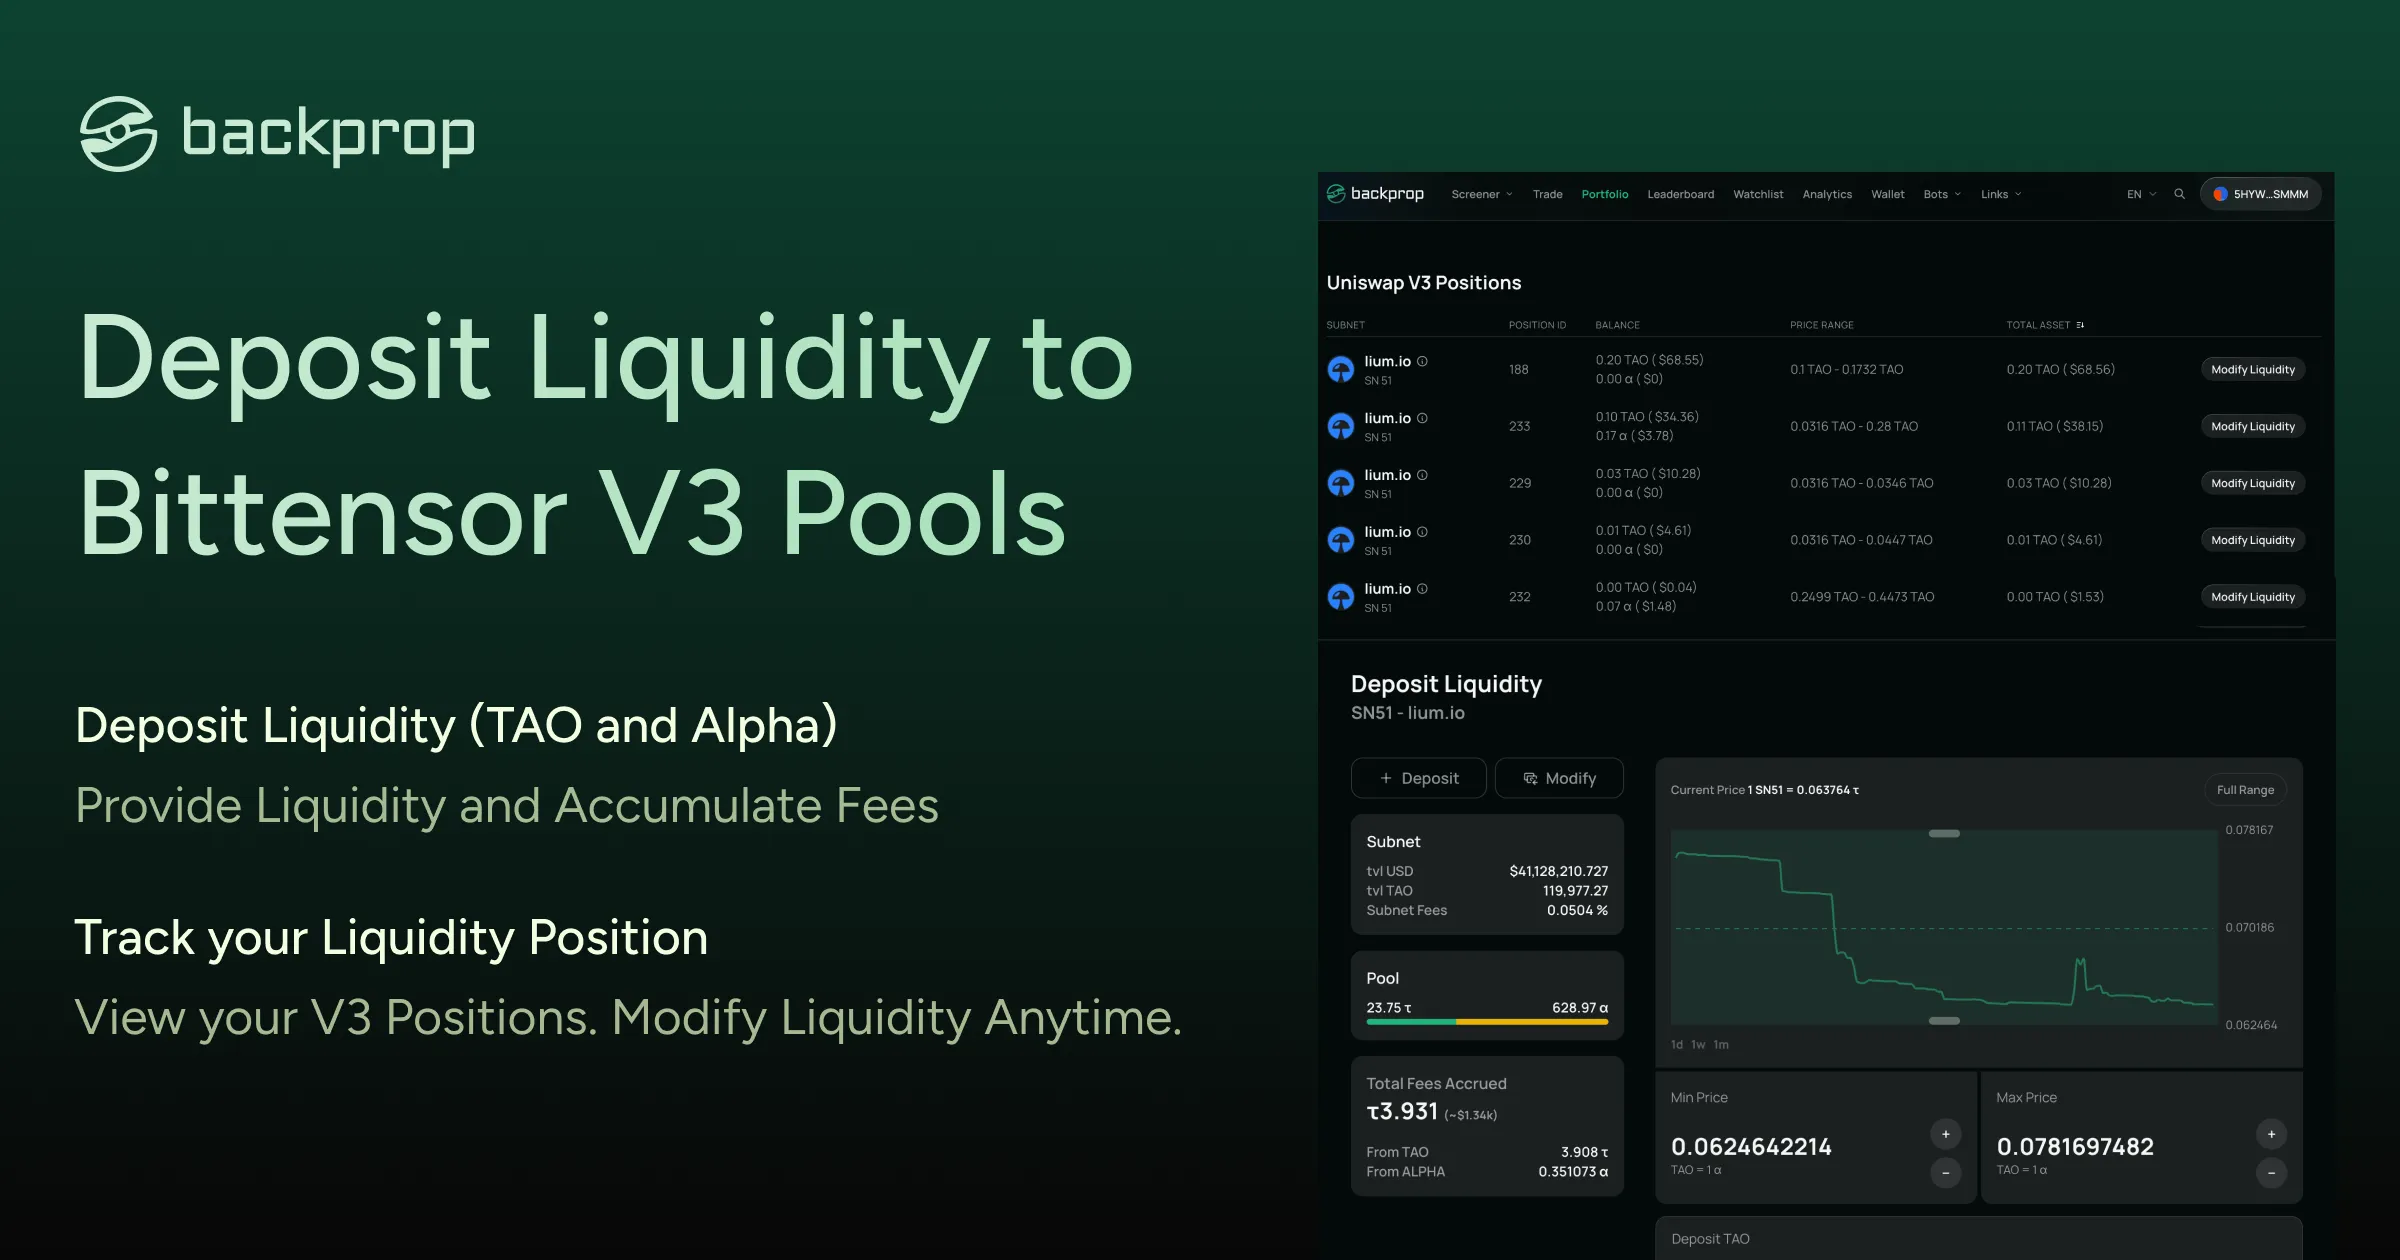
Step 5: View Your Positions
After successfully depositing liquidity, you can view and manage your positions:
- Navigate to Portfolio
- Click on the "Portfolio" tab in the main navigation
- You will see all your current Uniswap V3 positions
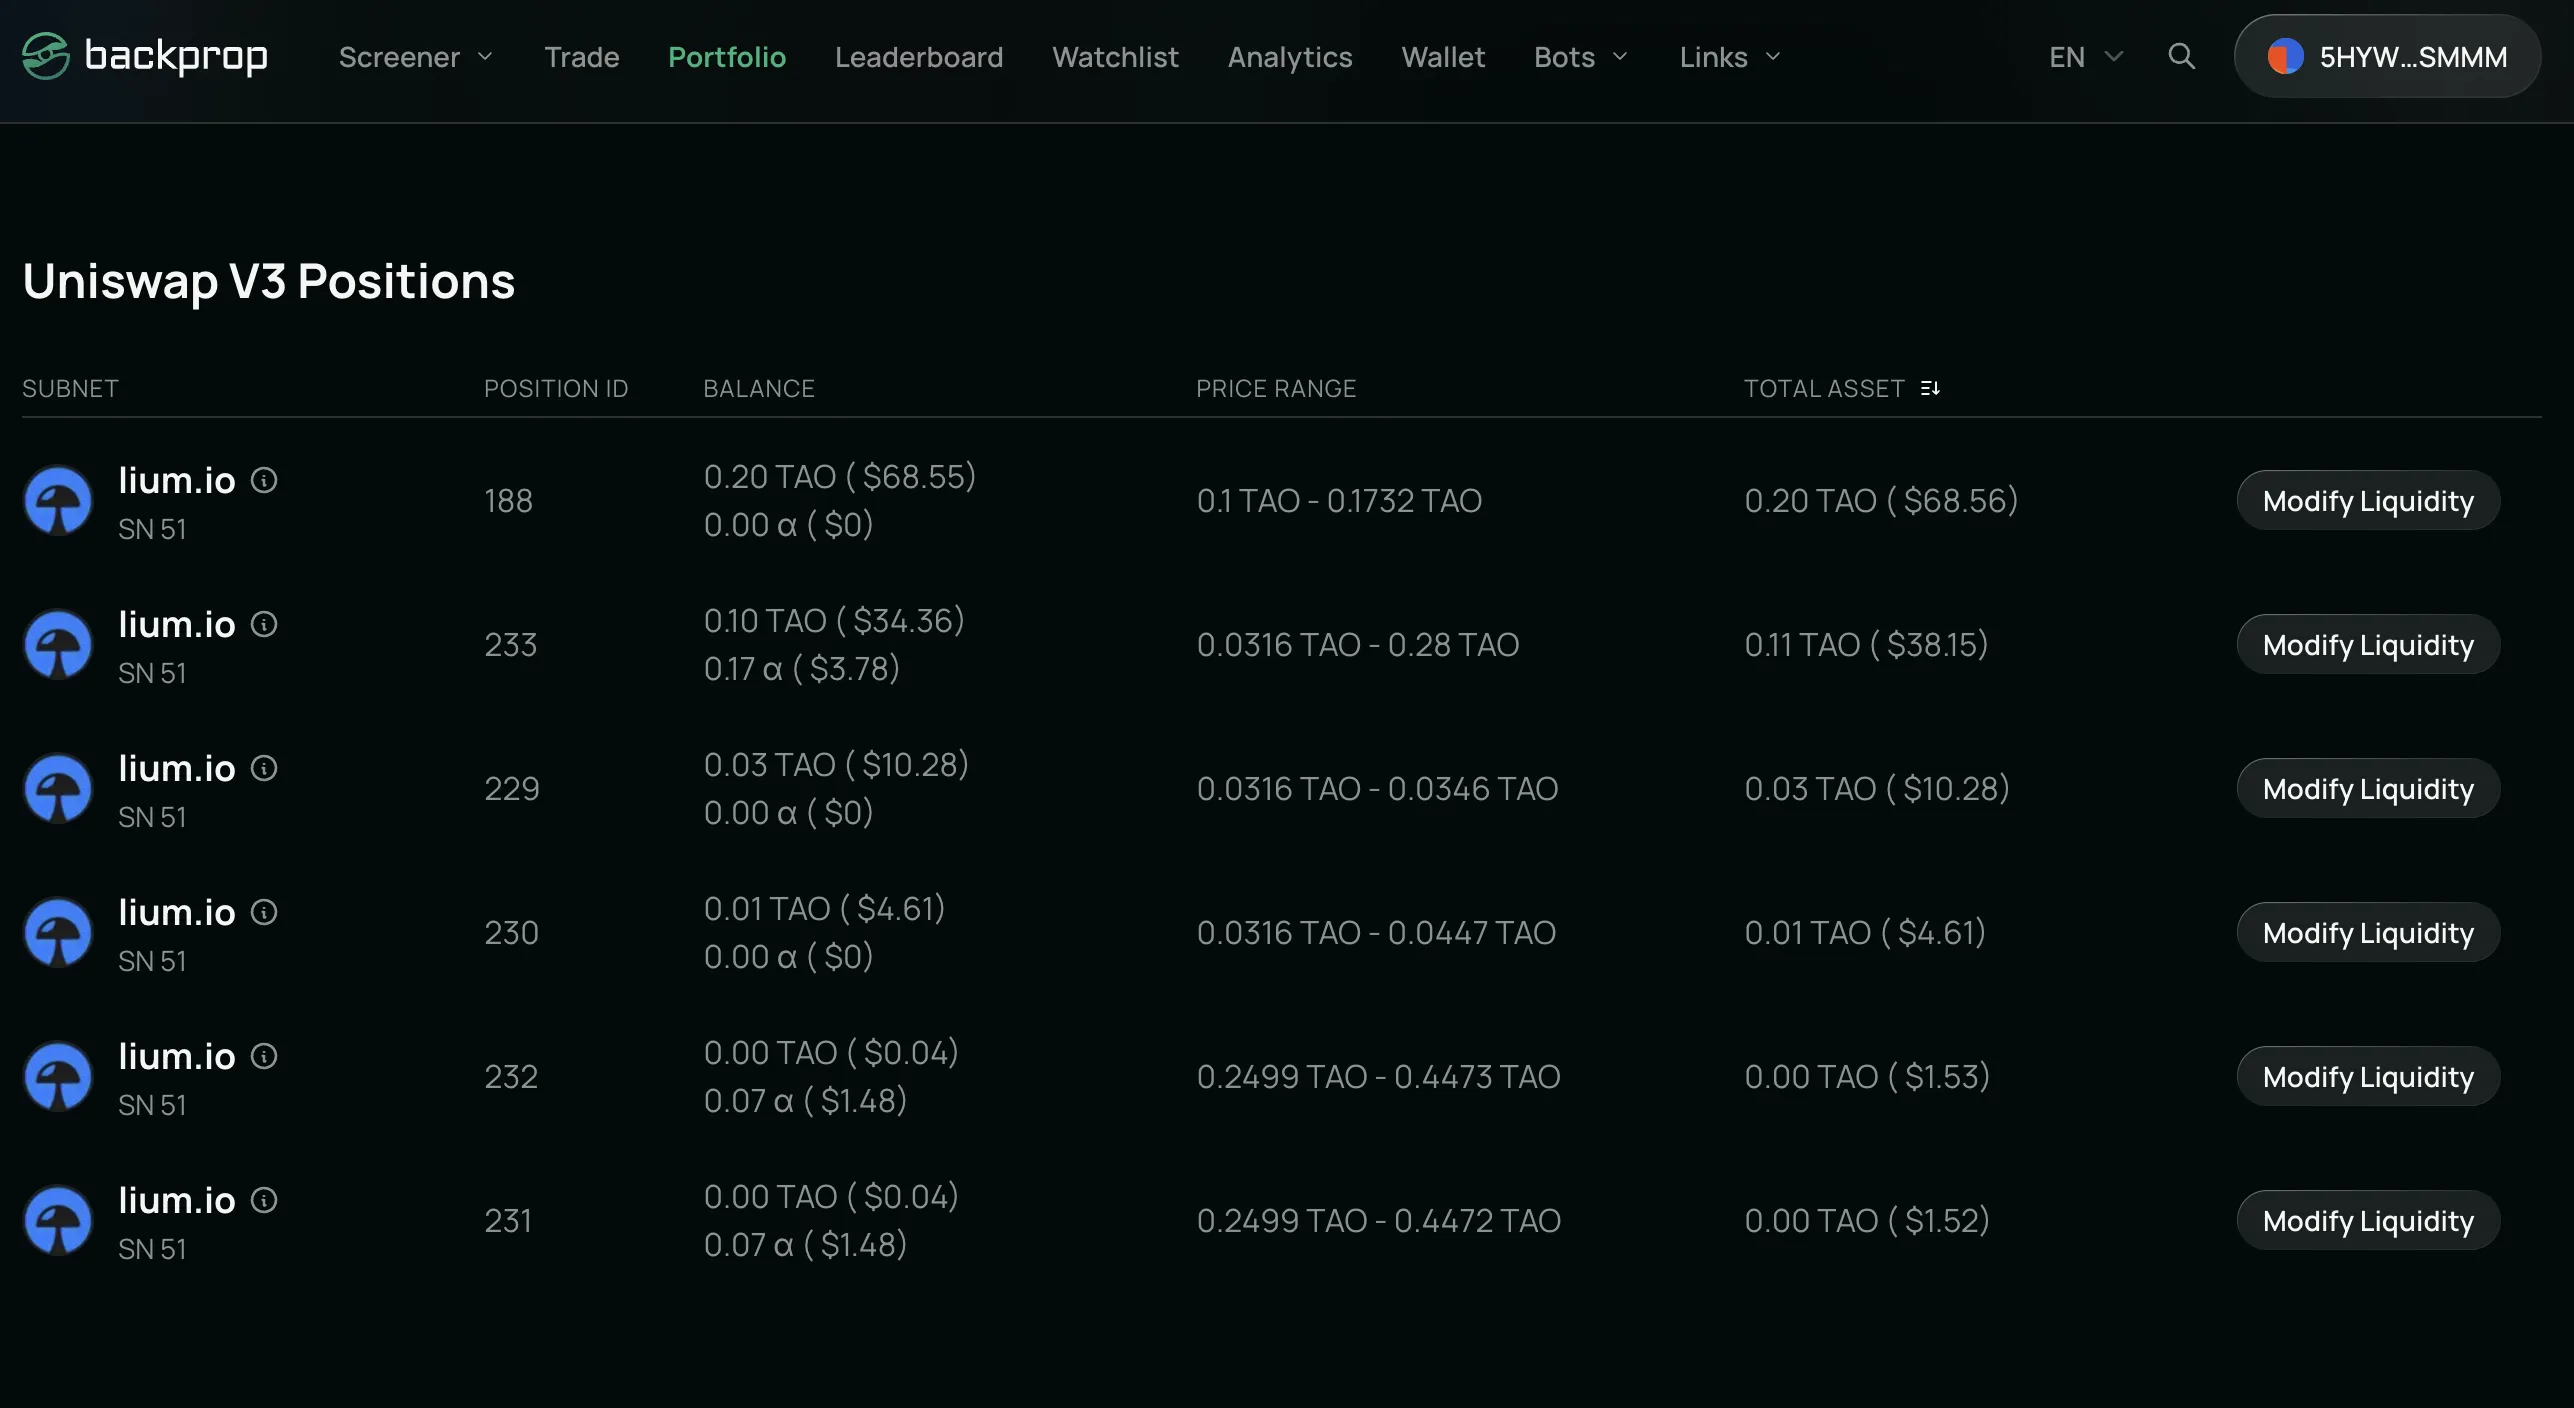
- Position Information
- Each position shows:
- Position ID: Unique identifier for your position
- Balance: Current token amounts in your position
- Price Range: Your min and max price settings
- Total Asset Value: Current TAO / USD value of your position
- Each position shows:
Step 6: Modify Your Liquidity
You can modify your existing positions by adding more liquidity or withdrawing some/all of your liquidity:
Withdrawing Liquidity
- Access Modify Options
- Click "Modify Liquidity" next to your position
- This will take you to the liquidity management page
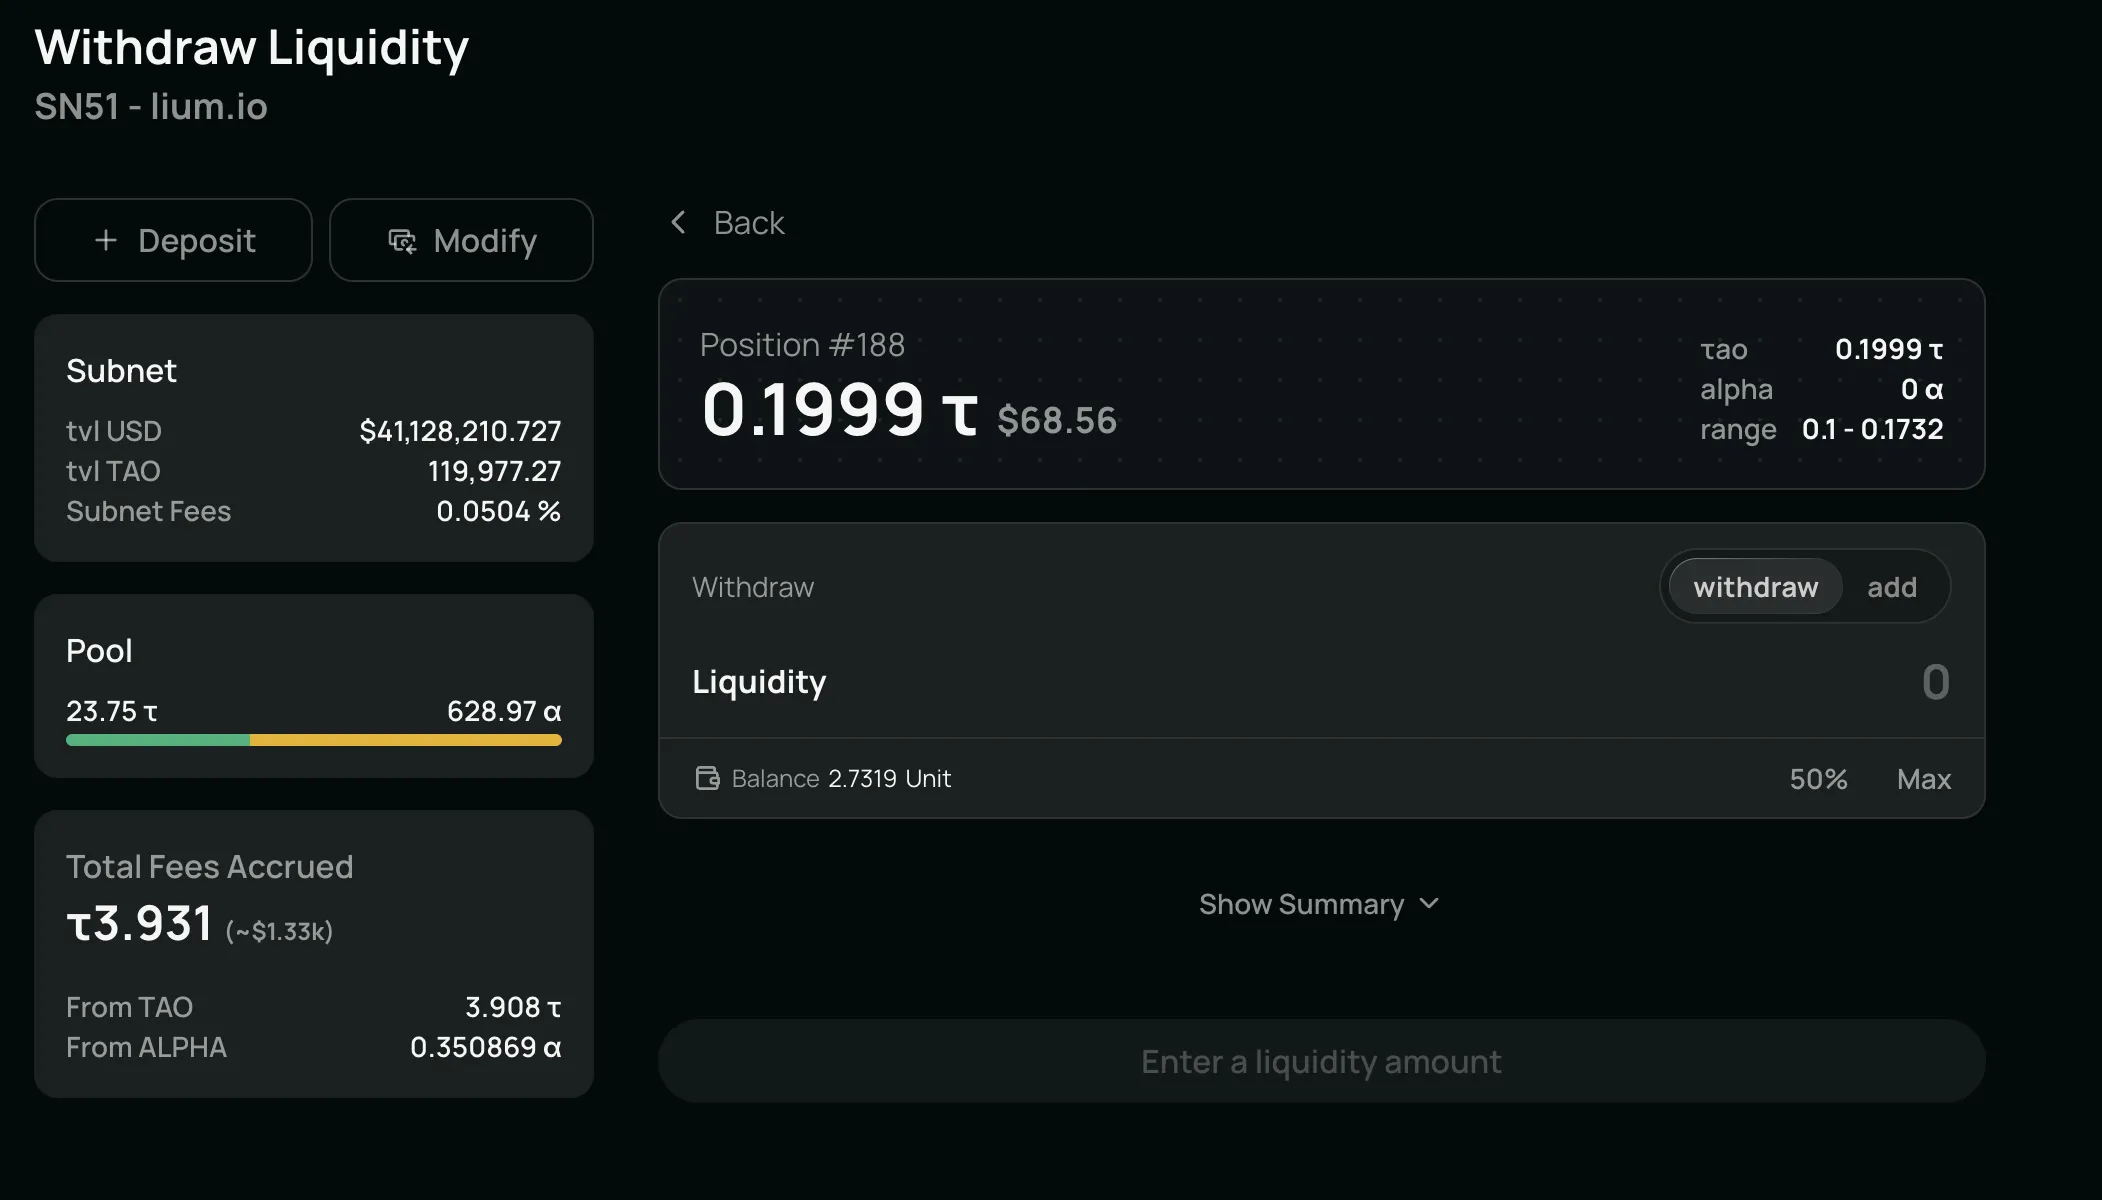
- Choose Withdrawal Amount
- Select how much liquidity you want to withdraw
- You can choose partial withdrawal (e.g., 50%) or full withdrawal (Max)
- Review the preview showing how much TAO and Alpha you'll receive
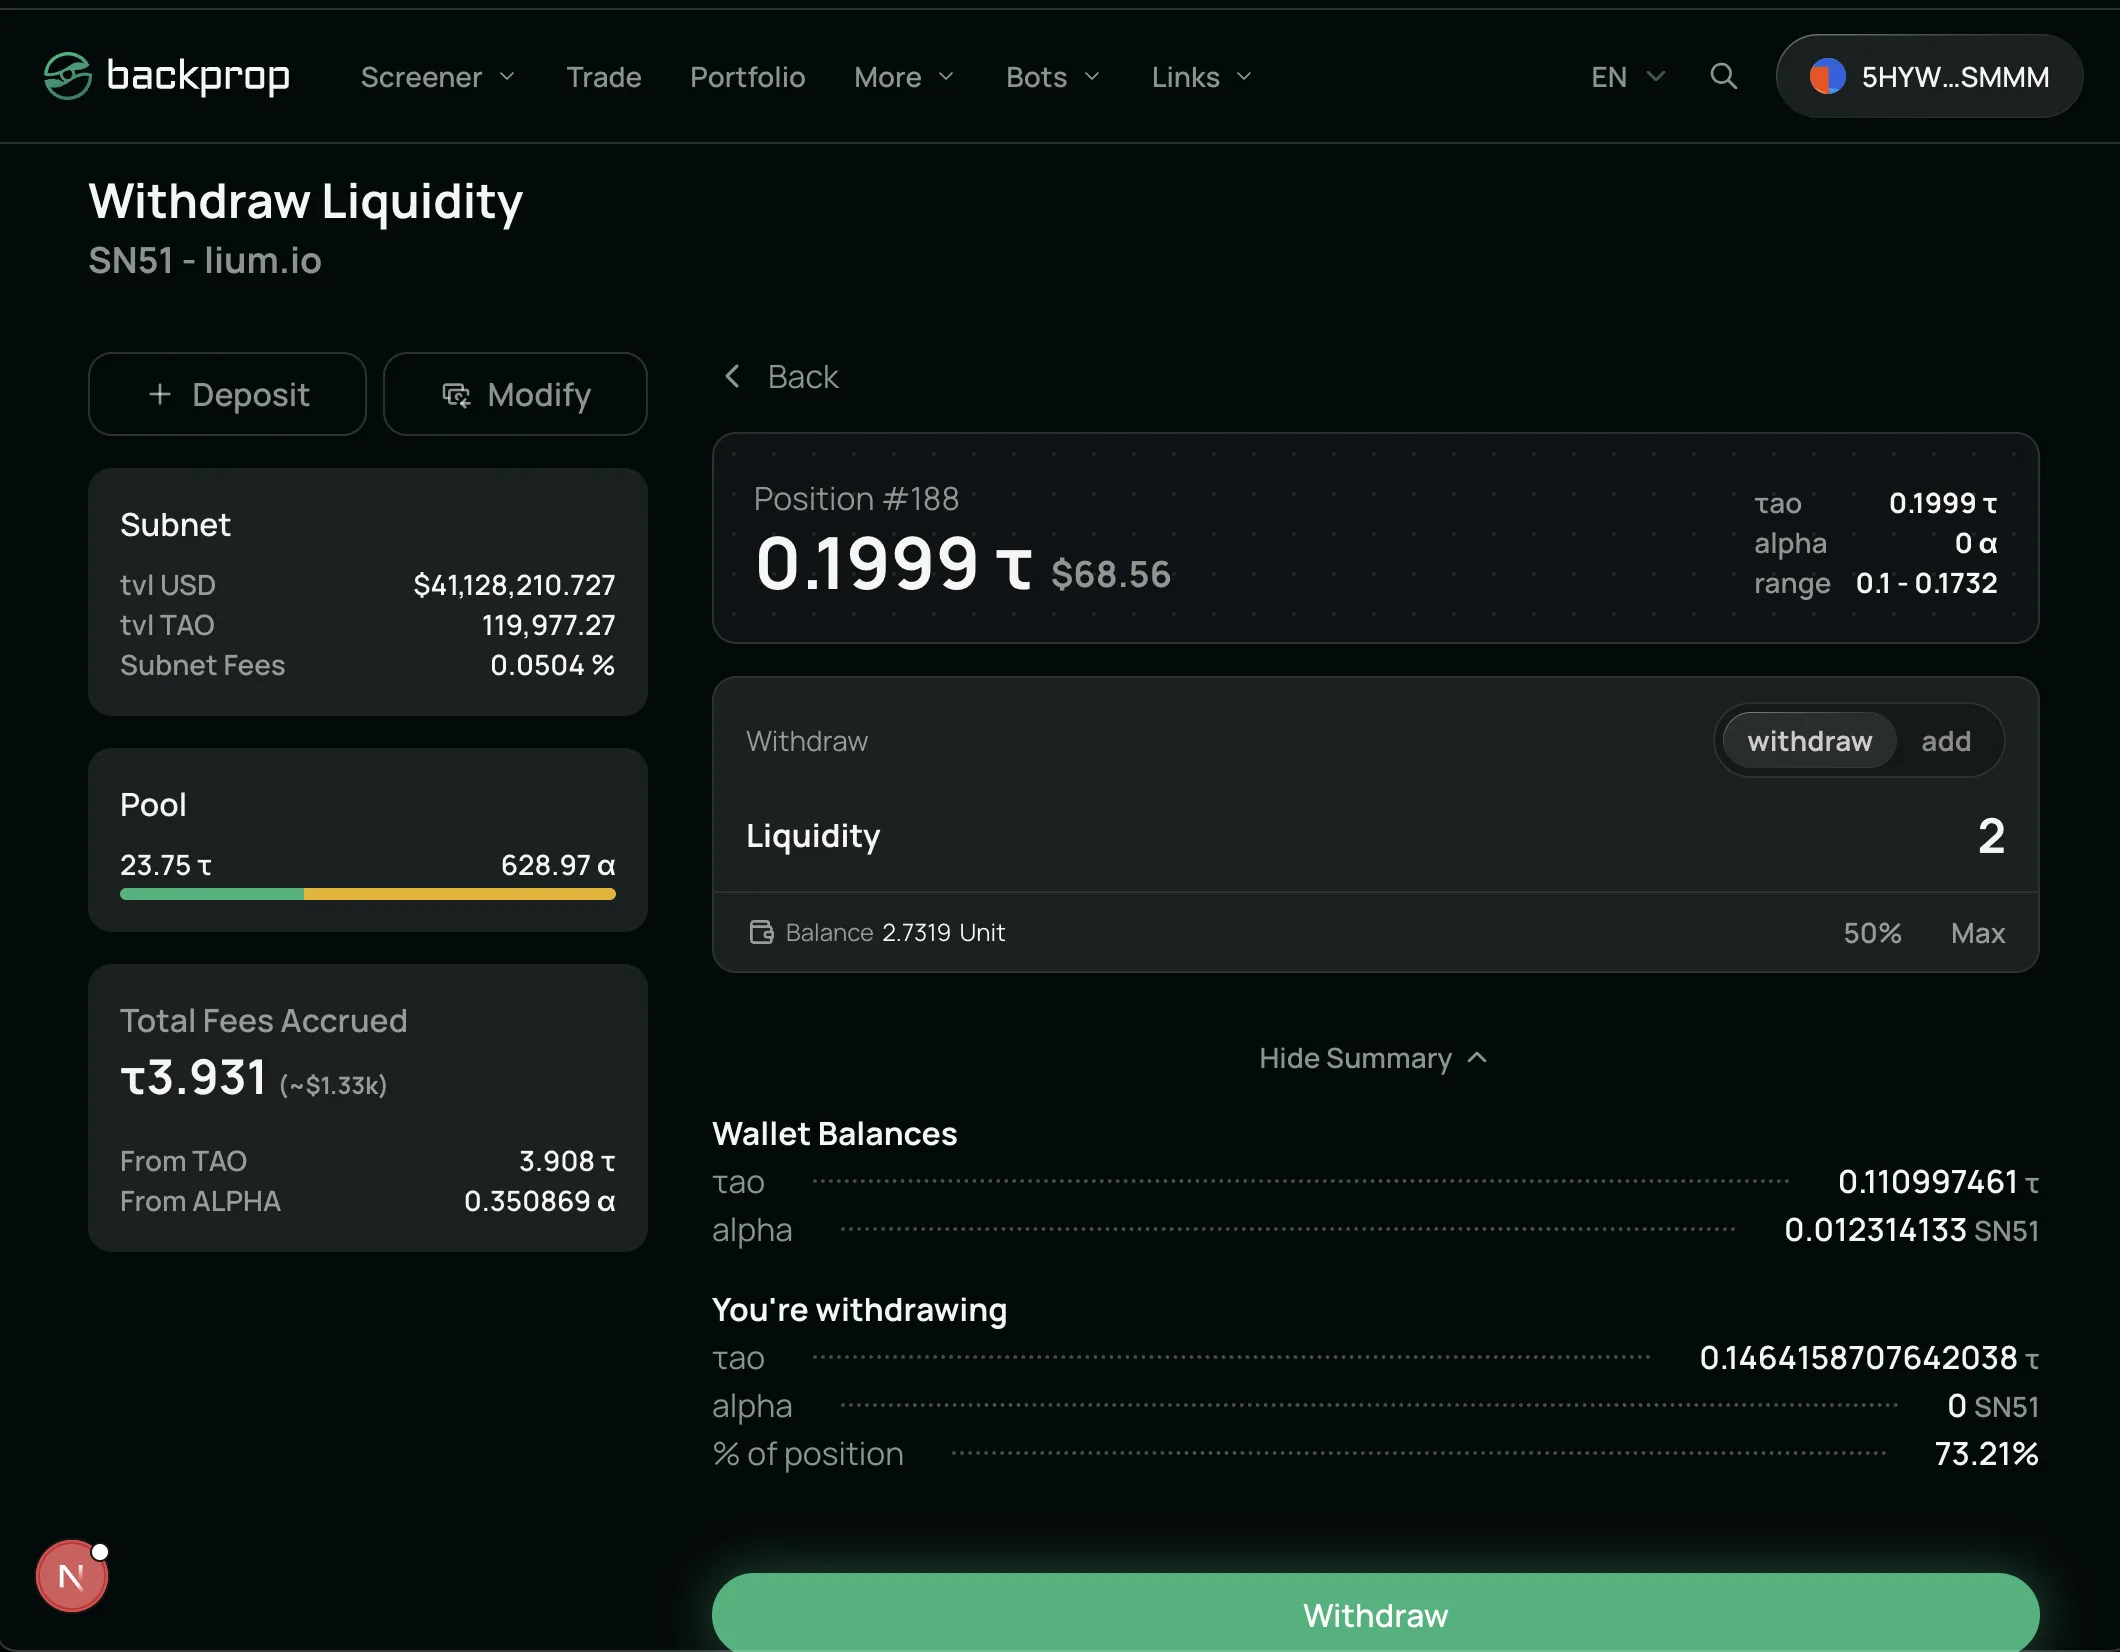
- Complete Withdrawal
- Click the "Withdraw" button
- Sign the transaction in your wallet
- Your TAO and/or Alpha that you deposited will be returned to your wallet balance + any accumulated fees
Important Note: Due to market fluctuations, the amount of TAO and Alpha you will receive after withdrawal might differ from the initial deposit amount.
Adding More Liquidity
-
Select Add Option
- Choose to add more liquidity to your existing position
- Enter the amount of additional liquidity you want to add
-
Review Requirements
- The interface will show you how much additional TAO and/or Alpha you need
- Ensure you have sufficient balances in your wallet
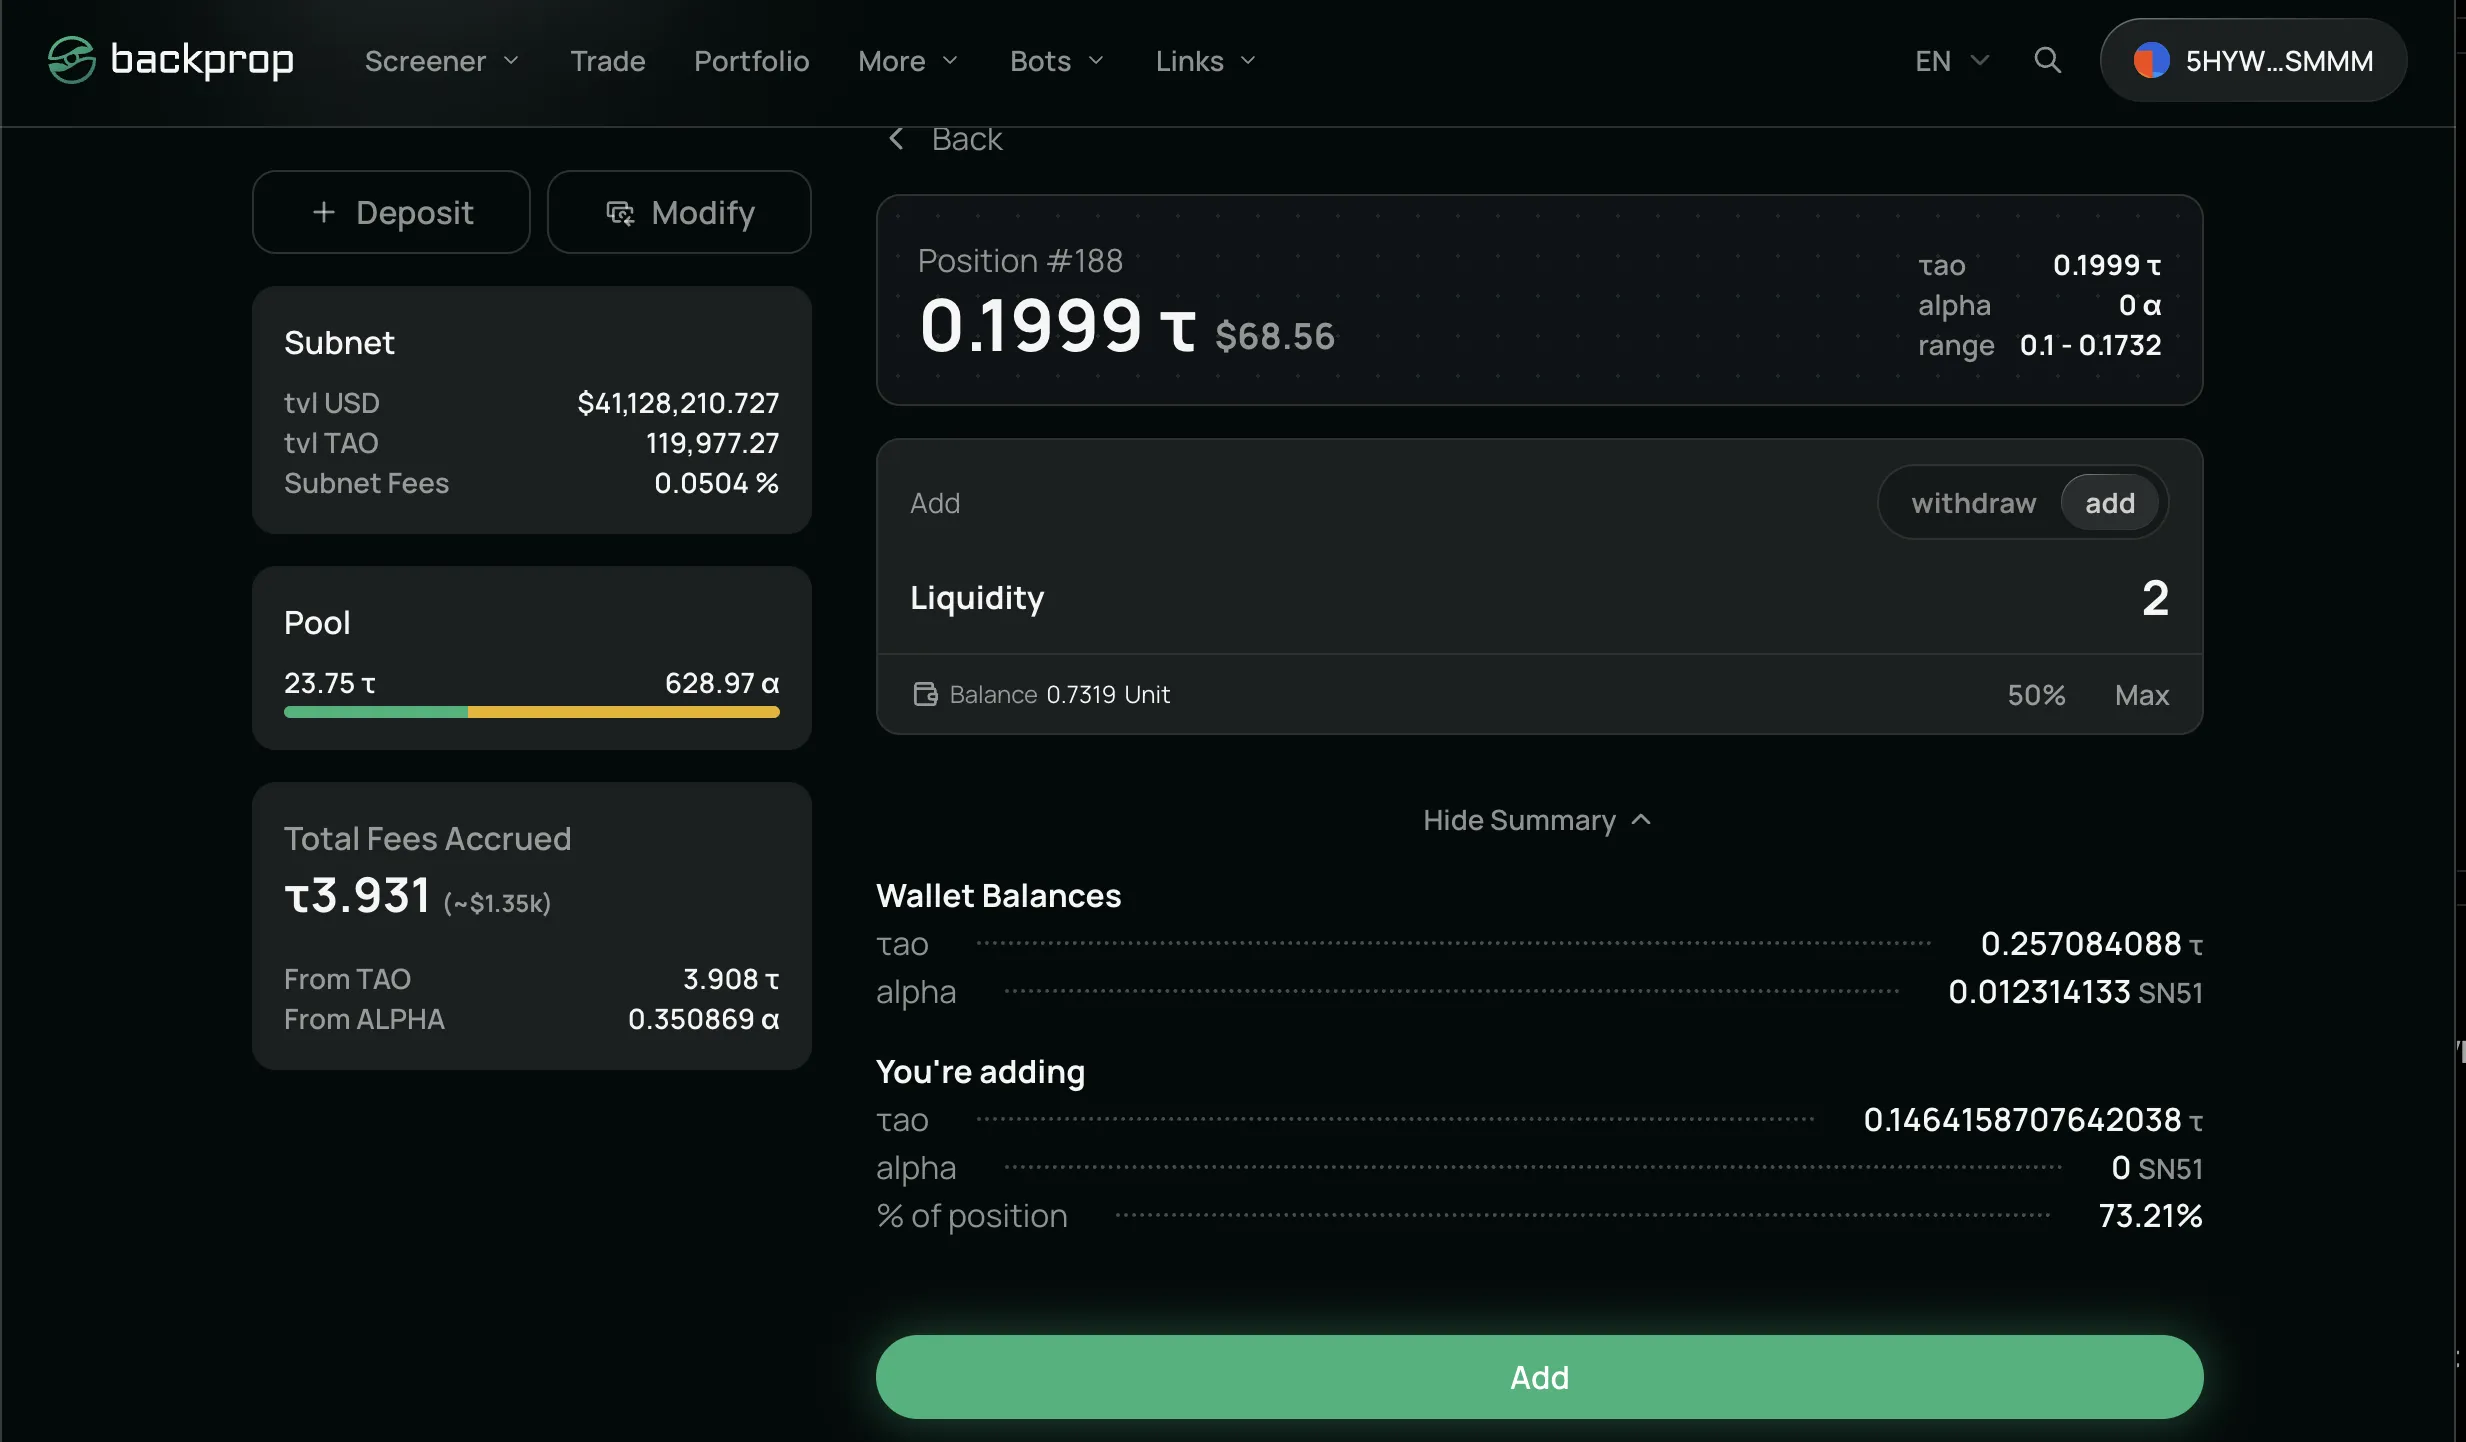
- Confirm Addition
- Review the transaction details
- Click "Add" to proceed
- Sign the transaction in your wallet
Key Tips for Success
Choose Your Range Wisely:
- Wider ranges = Lower risk of being out-of-range, but lower fee earnings
- Narrower ranges = Higher fee potential, but higher risk of price moving out-of-range
Risk Management:
- Monitor your position regularly
- Understand that token ratios will change as price moves through your range
- Be prepared for impermanent loss if you exit at unfavorable prices
Active Management Required:
- V3 positions need more attention than traditional liquidity provision such as Uniswap v2
- Consider adjusting ranges if price moves significantly
Remember: V3 liquidity provision is more complex compared to normal Uniswap V2 Pools. Please do due dilligence and research on how Uniswap V3 works.